
The 12xxx set of error codes show up when you try to install or update QuickBooks Desktop. One such error is QuickBooks error 12057. Notably, this error appears due to various connectivity errors. However, insufficient admin privileges may also lead to this error. Various other error codes that come in this category of technical errors are Error 12001, Error 12007, Error 12008 and Error 12057.
What is QuickBooks Error 12057?
The QuickBooks Payroll Error 12057 occurs when QuickBooks is unable to connect to the internet due to network timeout or connectivity issues. This error may also occur if there are problems with the SSL settings or if the firewall is blocking QuickBooks from accessing the internet. The primary causes of such error in QuickBooks are as:
- Misconfigured SSL settings.
- Poor internet network.
- The user may be lacking the admin rights mandated to update QuickBooks.
Principal causative factors behind Error 12057 in QuickBooks
- Incorrect SSL settings may lead to Error 12057.
- Poor internet connectivity can be another primary reason for this error.
- Insufficient admin rights can also provoke Error 12057 while updating QuickBooks Desktop.
Easy Fixes for Error 12057 in QuickBooks
Here are a few troubleshooting steps you can take to resolve QuickBooks Error 12057:
Fix 1: Use the safe mode to update QuickBooks
- Restart your computer.
- Press the F8 key repeatedly until the Advanced Boot Options screen appears.
- Select the Safe mode with networking
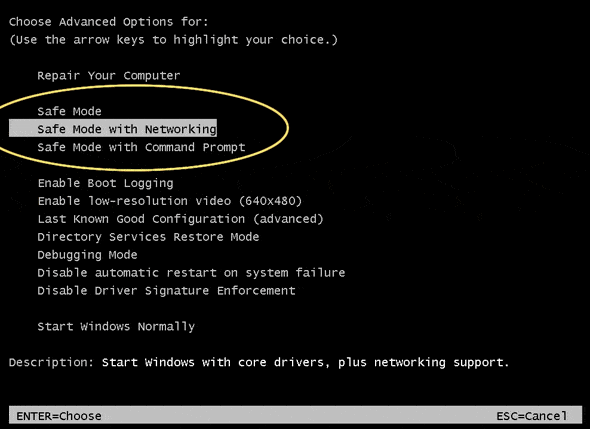
- Press the Enter key to start Windows in the safe mode.
- Open QuickBooks and attempt to Update QuickBooks.
Fix 2: Enable SSL 2.0 and SSL 3.0
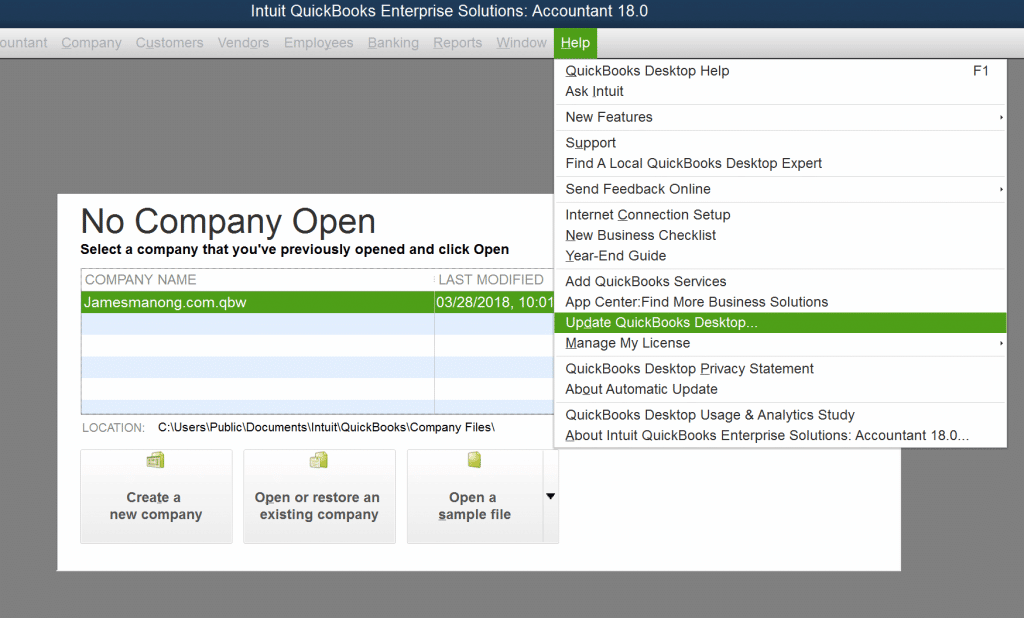
- Open QuickBooks Desktop.
- Now, click on the Help
- After that, select the Internet Connection Setup
- Choose the option to allow the software to use the Internet connection settings to establish a connection to the Internet.
- After that, click on Next.
- Now, move to the Advanced
- Then, click on Advanced Connection Settings
- Now, visit the Security
- Herein, choose the option to Use SSL 2.0 and Use SSL 3.0.
- Click on Ok.
- After that, hit on Done.
- Try to update QuickBooks
Fix 3: Open the PC as administrator
- Open the Control Panel.
- Now, move to User Accounts section in the Control Panel.
- Now, allow all the administrator permissions for the user.
- Lastly, right-click the QuickBooks icon and select Run as administrator
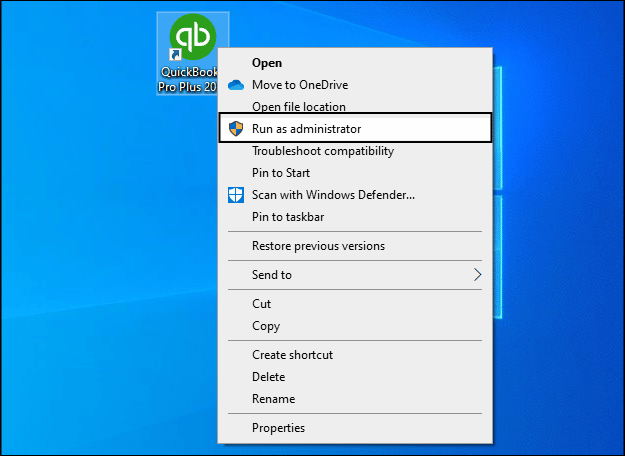
- Go to the Help menu now, then attempt to update QB.
Fix 4: Check your internet connectivity
Make sure your internet connection is stable and working properly.
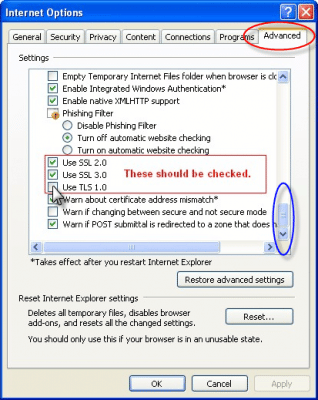
Fix 5: Verify SSL settings
Ensure that SSL is enabled in Internet Explorer. To verify SSL settings in Internet Explorer, follow these steps:
- Open Internet Explorer.
- Click on the gear icon in the top-right corner of the window.
- Select “Internet Options” from the drop-down menu.
- Click on the “Advanced” tab.
- Scroll down to the “Security” section.
- Ensure that the following options are checked:
- “Use SSL 2.0”
- “Use SSL 3.0”
- “Use TLS 1.0”
- “Use TLS 1.1”
- “Use TLS 1.2”
- Click “Apply” and then “OK” to save the changes.
After you have completed these steps, restart QuickBooks and see if the issue has been resolved. If the issue persists, you may need to consult with your IT department or network administrator to ensure that your SSL settings are configured correctly.
Fix 6: Reset QuickBooks updates
Ensure you have the latest version of QuickBooks installed.
Reset QuickBooks Update Settings: Go to Help > Update QuickBooks > Options and click on Reset Updates.
Fix 7: Configure Firewall Settings
To configure the Firewall settings for QuickBooks, follow these steps:
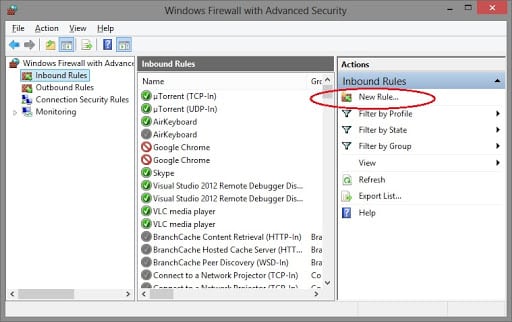
- Open the Windows Start menu and search for “Firewall“.
- Select “Windows Defender Firewall with Advanced Security” from the search results.
- Click on “Inbound Rules” in the left pane of the window.
- Click on “New Rule” in the right pane.
- Select “Program” and click “Next“.
- Click “This program path” and then browse to the location of the QuickBooks executable file (usually found in C:\Program Files\Intuit\QuickBooks).
- Click “Next” and then select “Allow the connection” and click “Next” again.
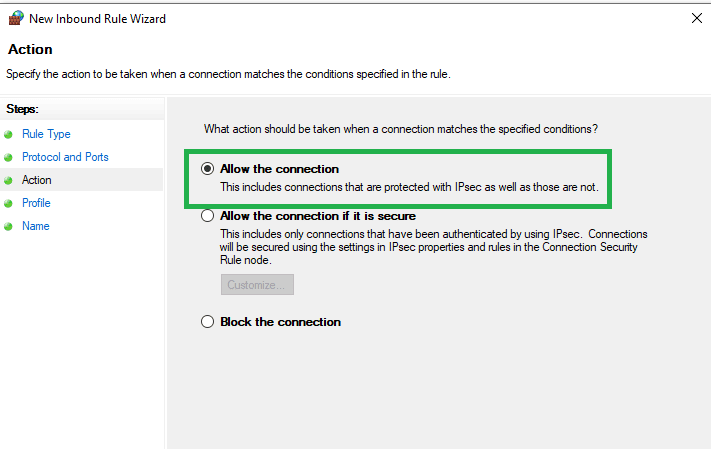
- Ensure that all three options (“Domain“, “Private“, and “Public“) are checked and click “Next“.
- Give the rule a name (e.g., “QuickBooks Firewall Rule“) and click “Finish“.
- Repeat steps 3-9 for Outbound Rules.
After you have completed these steps, restart QuickBooks and see if the issue has been resolved. If the issue persists, you may need to consult with your IT department or network administrator to ensure that QuickBooks is allowed to communicate through your network’s firewall.
Fix 8: Check your antivirus
Your antivirus may be blocking QuickBooks from accessing the internet. Temporarily disable your antivirus software and see if the issue is resolved.
Wind up!
Error 12057 in QuickBooks is typically a connectivity-related error that may show up any time and hinder your QuickBooks operations. Being a common error, its resolution is pretty easy and performing few set of troubleshooting solutions will do the trick. However, you can also take assistance from our QuickBooks payroll error support team for further help.
