
This post is not about choosing ugly photos for your blog, nor is it about forgetting to put the photo credits. Everyone knows that, right? Today we are going to talk about 4 less obvious but serious image errors that can be even worse for your blog.
1 – WEIGH-IN IMAGES AND FORGET WORDS
We already know how awesome Pinterest has been for blogs. It is the tool that helps to drive traffic to your blog. Attractive, pinnable images are important for driving Pinterest traffic to your blog. But some bloggers end up burying the important post text within their posting images. Or they pack their posts with lots of beautiful images, but they write about 100 words in total.
It doesn’t help you when it comes to SEO ( Search Engine Optimization ). Search bots cannot “read” your images. It’s just an alt tag for them. Google loves messages with many words. Posts with 1600 or 2400 words rank better when comparing search terms.
A beautiful infographic or pinnable image is great for your post, but including the details in the actual text of the post is also great. Make your post thinking about SEO and user-friendly accessibility and avoid this error.
If you hid the text inside your Pinterest images, you can do three things to solve this problem:
- Write the text of each image in the body of the text;
- Add the text as an image caption;
- Or add the text for each image as alt text.
Don’t know what alt text is (or alternative text)? Go to the second error below.
2 – IGNORE ALTERNATIVE TEXT
Even if your posts have the proper image to text ratio, you may be neglecting the alternate text in your images, and that’s a shame! The alternative text of the image is important for blog accessibility and SEO.
Alt text helps visually impaired visitors. Screen readers read the alternate text in the image as part of the body text. Providing good alt tags helps describe your photos to your visually impaired readers. It also provides important information about your images to search engines and makes your images attractive through visual search engines like Google Image Search and Bing Images. It can also help make your website more useful for visitors with very slow internet connections.
ADDING ALT TEXT TO WORDPRESS
WordPress does an excellent job of making it easy for you to add alternative text to your images. When you upload an image through the WordPress media loader, you are presented with this screen:
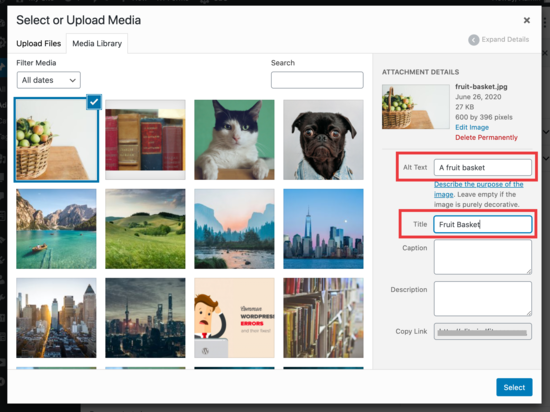
Everything you type in the “Alt Text” field will become the image’s alternative text. Too easy.
ADDING ALT TEXT TO BLOGGER
Blogger is also easy to add alt text. In your post edit view, click on the image and then click on the “Properties” link at the bottom. This screen will appear:
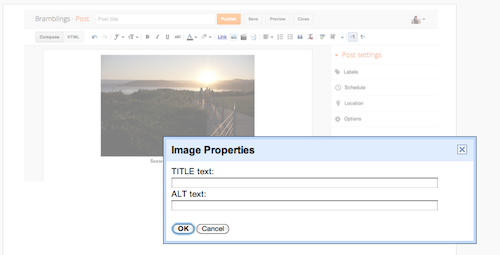
Your images now make more sense for the entire internet. Look how nice it is!!!
A good alternative text has a description of what your image is. It is also a good place for keywords. This can help to increase SEO.😉
3 – FORGET COLOR VISION DIFFERENCES
Color perception varies from person to person. Some color combos, in particular, are difficult for many people to see. If you have a “normal” color vision, you may not realize that your favourite color combination is difficult to read or completely invisible to others. For example, black text on a red background is invisible to some people with red vision impairment.
Fortunately, there are some tools online to simulate different types of color perception. You can test different color combinations before adding them to your blog.
- Color Vision, a color palette creator that helps you find color combos that are universally friendly to the display.
- In Colorfilter, you can view simulations of how your site looks for people with different types of color vision disabilities.
4 – USE LARGE IMAGE FILES
You want the images on your blog to be sharp and beautiful, right? But many bloggers make the mistake of uploading images to their blog that are much larger than they need to be.
Larger files mean that images take longer to load. The speed of the blog is an important SEO factor. Google likes faster sites. In addition, visitors do not want to sit for a minute or more waiting for all of their images to be uploaded. If you have heavy posts with up to 30 or more images, your post may take a long time to load and internet users today don’t have much patience to wait. Do you expect an image to load on some website?
HERE ARE SOME TIPS TO OPTIMIZE YOUR IMAGES AND IMPROVE SPEED:
-
- Set the image resolution to 72 pixels. Web browsers cannot display a higher resolution.
- Properly sized images. We often see bloggers uploading images that are 3000 pixels wide or more. The posting area on most blogs is between 600 to 800 pixels wide. These images are almost 4 times the required size. You can use a free online tool like resizeimage.net to scale your images to the right size.
- Compress the images. Compressing your images can help reduce your file size by up to 50% or more! Attention to use a lossless method to be of better quality. There are some good tools online to compress your images. Bookmark compressjpeg.com that you can compress into batches of images. You can control the image quality in relation to the file size. Compressor.io has a very clean and easy to use interface that has a good preview with before and after.
Do one of these things to keep your files from slowing down your blog, SEO and bounce rates.
So, everything seems to be a lot to worry about “just” to improve the accessibility and SEO of your blog, but by doing a little of these things, you will see the improvement in the blog in no time.
What’s up? Did you already know these mistakes? Have you ever made any of these mistakes before? Comment here!
