
An eye examination is one of the most important diagnostic tests that a doctor can perform. They are crucial to detect many medical problems and diseases, such as diabetes and high blood pressure.
The pupil exam and pupil diameter measurement is an integral part of this examination because it helps detect abnormalities in the brain or central nervous system.
This article will take you through how to perform pupil examination, the steps involved, and valuable tips.
What is a pupil examination?
Pupil examination or pupillary reflex test is an eye check that looks at the function of your eyes under certain conditions like darkness (pupils dilate) or light (pupil constricts).
The pupillary evaluation is also used to assess the health of your brain or nervous system, especially in cases like head injury, stroke, and other central nervous diseases.
Why is pupil examination necessary?
Pupil examination will help detect medical problems that cannot be seen using any other eye tests. They are crucial to diagnosing abnormalities in the following parts:
- Brain-related issues, such as head injuries, tumors, high intracranial pressure, etc.
- Nervous system-related issues – multiple sclerosis (nerve fiber), myasthenia gravis (muscle weakness), neurosyphilis (neurological disorder).
Five features of pupil examination
Doctors use several factors while performing this test, including:
Size
Doctors will take a papillary size measurement and find out whether they react to light appropriately. A small pupil could indicate that the patient has suffered a stroke or damage to their optic nerve. In contrast, an abnormally large pupil can be caused by high levels of alcohol consumption, certain medications such as some antipsychotics, and poisons like carbon monoxide poisoning, which inhibits oxygen delivery to cells.
Shape
Doctors will look at the shape of pupils to see if they are round or oblong. This is due to some medical conditions affecting muscles that may cause one pupil to be more rounded than the other, such as myasthenia gravis (muscle weakness) and neurosyphilis (neurological disorder).
Position
This is also known as the afferent pupillary defect test. In this test, a light source will be shone into one eye at a time and then compared with the other pupil to see if they are equal or not.
If there is no response from one of them, it indicates that there may have been damage to the optic nerve, which could mean many things such as an injury or stroke.
Color
The color of the pupil is usually black or dark brown. However, some rare conditions can affect their appearances, such as Horner’s syndrome (sympathetic nervous system) and heterochromia iridis (color difference).
Symmetry
It is essential to check the symmetry of the pupils. Suppose one pupil does not react in a consensual reflex or direct reflex. In that case, a doctor will need further investigation as this could indicate damage somewhere in that eye, optic nerve, and even brain, in which case a pupillary response in traumatic brain injury is ascertained.
Pupil Measurement: Performing the exam
- Step 1: Seating Position
Before conducting pupil examination, doctors need to situate themselves in a position where light can quickly reach their patient’s eyes without obstructing vision.
For example, if you were examining yourself, this would mean sitting directly opposite your face with good lighting on both sides of you. Patients mustn’t move around during this part, as any change in position could affect the results of your pupil examination.
- Step 2: Fixation
The second step involves fixing your patient’s gaze on a specifically designated point. This step allows you to observe pupil response by checking the reaction of both pupils to light and their movement towards or away from any stimulus.
In doing this, ensure that the designated point you’ve chosen is in the center of your patient’s field of vision and that they don’t try to focus on it.
- Step 3: Room Lighting
Ensure that the room is well-lit and not too bright. The lighting should be diffuse (not direct), and there should be no strong shadows on your patient’s face or in their eyes, as this could affect pupil response to light; it might also cause them discomfort.
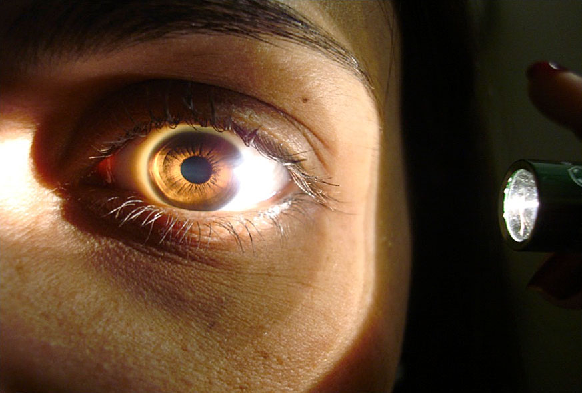
- Step 4: Illumination
The fourth step involves using a pen torch with an oblique beam of light directed towards one eye at a time so you can observe both pupils’ reactions to illumination.
Holding the torch close enough for your patient to see but far away enough for you to view their pupil responses will help simplify things further. You’ll need to move around until you find just the proper distance from which every observation becomes easy.
- Step 5: Dark Irises
The final step of pupil examination involves shining a bright, oblique beam of light into the patient’s eyes and observing their responses.
In this case, you’ll be looking to see if the pupils dilate once again after being exposed to high levels of illumination for some time. They usually would contract slightly but not entirely as they adjust to brightness or glare from your torchlight.
If patients have dark irises, it becomes more difficult to evaluate them, so ask them what color their eyes are first before performing test five on them; otherwise, it could affect pupil response to light and cause them discomfort.
Examining Pupil Reflexes
Direct reflex
The direct reflex is assessed by shining a light into the patient’s eye and observing how it reflects their pupil. Typically, one should see roundish reflection coming from both pupils as they constrict due to direct reflex in response to bright illumination of the eyes.
Consensual reflex
The consensual reflex is assessed by shining a light into one eye of the patient and observing how it reflects from their pupil. Typically, both pupils constrict due to direct response in even lighting conditions; however, if there are any problems with the pathway between the retina of each eye or optic nerve, this will not occur.
Near reflex
The near reflex is assessed by asking the patient to look at a close object. Suppose there is any problem with their optic nerve or retina causing anything from blindness to partial vision loss. In that case, their pupil will not respond accordingly and stay dilated instead of constricting as it should do in response to direct reflex, which can help indicate problems along these lines.
Test for relative afferent pupillary defect or RAPD)/Marcus Gunn Pupil
Doctors check for relative afferent pupillary defect (RAPD)/Marcus Gunn Pupil by first shining light into both pupils. However, the examiner must make sure that they keep them open long enough after the initial exposure time. RAPD cannot be appropriately assessed if this does not happen since the pupil will have already contracted due to direct stimulation/reflex.
Doing so would mean the pupil that is not directly exposed to the light will constrict and be smaller than its fellow.
