

Assuming you want your music heard, soundproofing a room can seem counter-intuitive. But keep in mind, you’re not necessarily doing it just to keep the sound in––you’re also doing it to keep other sounds out. Unwanted noise can creep into a studio space and make it really hard to get a clean recording. This is especially true if you are renting an apartment or share space with other people. You can’t always control these noise levels yourself, but fortunately, the average noise problem can be reduced by controlling your space, and soundproofing your home studio.
To accomplish a proper soundproofing project, you’ll need a room where you’ve considered the acoustic qualities and taken steps to control the environment. In this article, we’ll explore how to soundproof a room for music.
How To Soundproof a Room for Music
Music is more than just creating––it’s also about “capturing.” If you want to capture your music at its ultimate potential, regardless of the time of day, you need to control every aspect of the performance space dynamic. The better you can do this, the better your recording studio will function.
Just to get a little terminology out of the way: soundproofing involves using various materials and treatments in order to stop or dampen sound transmission in a particular area. The effects of soundproofing can go in both directions. You can soften the sound transmission both coming into the room and going out.
Of course, perfect soundproofing of a room is not scientifically possible. All the same, some artists take this to a ridiculous extreme, and there are legendary stories about demands that may seem insane and absurd. Maybe someday down the road, you’ll worry about how barometric pressure and humidity affect your sound, but for the purposes of––this article, we’ll just focus on a few basic steps to ensure a great sounding room. Here are some tips to help you get started:
1. First, Consider Your Space
We wish we could tell you differently, but soundproofing a room isn’t something you can do in a few minutes. Regardless, it’s still a necessary project to take on, and it doesn’t have to be boring.
That said, if you’re renting, it’s probably best to consider your studio to be a semi-permanent feature in your home.
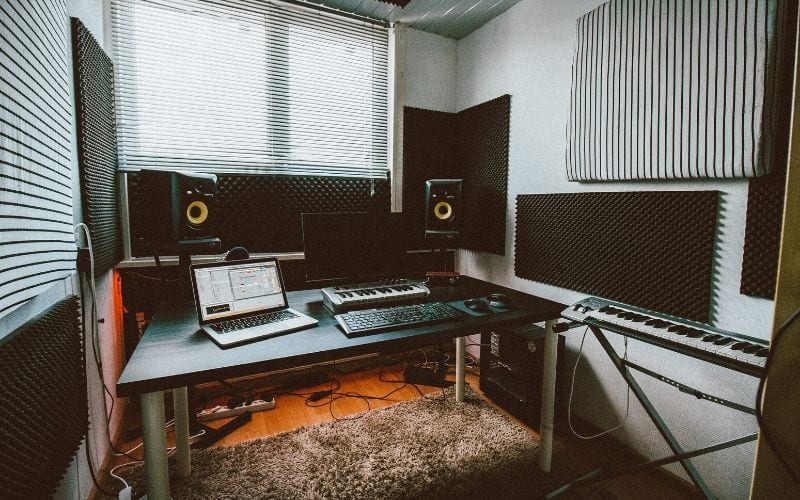
Consider the size of your room and keep in mind that adding sound-absorbing material will take up a considerable amount of space. If you plan to have a drum kit in your soundproof room, you’ll need a considerable amount of space than if you have, say, just a desk, computer, and keyboard.
So, if you’re just recording vocals and instruments, your space can be smaller.
Just make sure your area doesn’t feel too claustrophobic for the amount of equipment and materials you’re trying to fit in it.
Another thing to keep in mind is that certain soundproofing techniques can shrink your available space. Perhaps you are adding materials to your walls, and you need to bring your equipment inside a certain range in order to create a suitable sound buffer. In this case, it’s going to be necessary to remember that the “available workspace” may actually be less than the maximum capacity of the room, once the soundproofing process is finished.
2. Seal Doors And Windows
You’ll need at least one doorway into your soundproof room.
Use a heavy door and make sure that the door completely seals when closed to prevent noise leakage from the sides. You can put sound dampening material on the inner surface of the door to assist the properties of the room.
A window is optional, but your recording place becomes a lot more comfortable with a little natural sunlight. Use a layer of acoustic glass to prevent reflections and vibrations, and a window will not compromise the soundproof qualities of your room.
Sometimes, you don’t really have a choice about the location of the doors and windows in your studio space. You just have to roll with whatever the layout gives you, and find creative ways to adapt.
Sealing Windows
This is one of the biggest challenges in your studio space. Windows can do a lot for the overall feel of your space, and natural sunlight will certainly brighten up an otherwise dreary room. However, windows are an enormous liability in terms of allowing outside noise to enter into your studio. Fortunately, this is a common problem, and there are some tried-and-true solutions.
If you’re willing to sacrifice the advantages of having the window in the first place, you can wall it off with fiberglass and plywood. That’s basically going to turn it into a wall. It has the benefit of being a relatively simple solution, inexpensive, and effective. It’s probably the best way of ensuring that you get the best possible sound barrier. If you don’t want to take any risks with outside noise, then that’s the way to go.
Of course, the downside is that you no longer have a window in the space, and maybe you want that. You can purchase kits that will make this possible, so you can adapt a window to being soundproof. Triple-paned windows can add extra layers of buffering that will keep them from allowing too much extra noise in. If the street outside your window is exceptionally noisy, you may not want to risk that, but it depends on your environment.
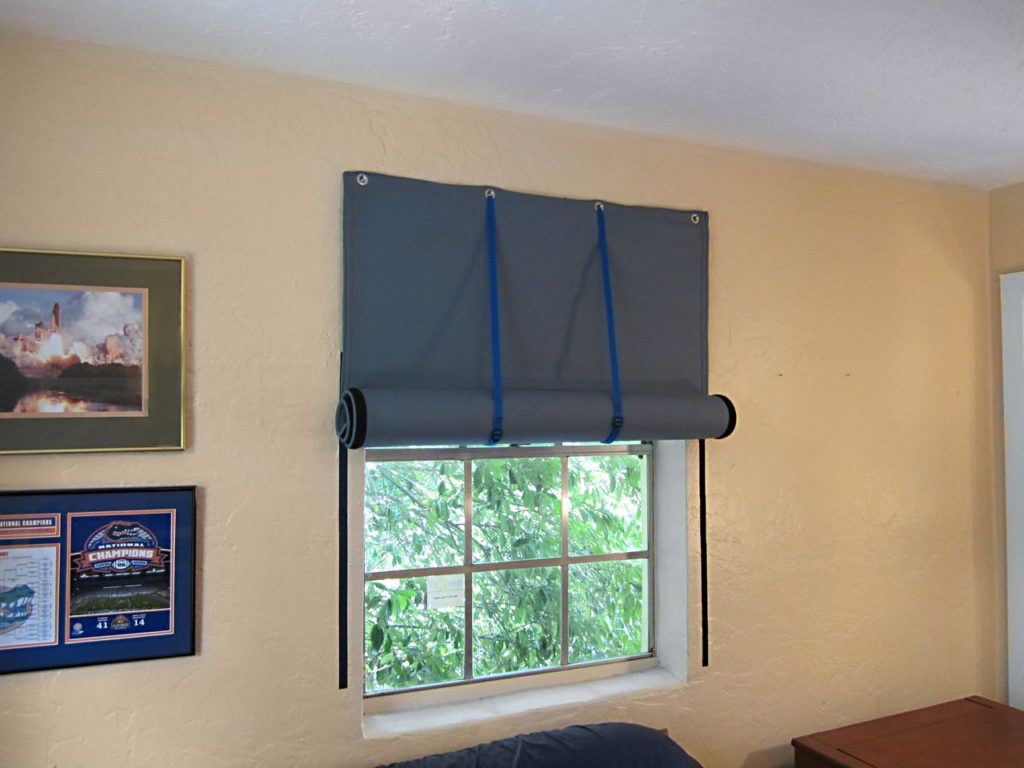
Alternatively, you can try an acoustic curtain (pictured above). Although they are effective for sound deadening, they’re nearly as effective as sound blockers. But they offer an easier and less-permanent solution. Want some sunlight? Simply roll them up.
Sealing Doors

Most interior doors don’t do a very good job of buffering against sound. Often, you may need to replace the door entirely if you really want to cut down on the sound transmission. If you replace the door, find a door that is designed to have good sound absorption qualities. Once you have it replaced, use a door sweep on the bottom to seal the space between the floor and the door itself.
So what kind of door constitutes a quality choice for a studio with “good sound absorption”? You may be surprised to learn that wood doors aren’t a bad choice, but they need to be solid wood. Most standard wood doors are hollow, which is why you always see them splinter into pieces in action movie fight scenes. A solid wood door is going to be much heavier and have better sound dampening qualities. If you don’t want to go that route, you can always look into getting a medium density fiber door.
In addition to the door sweep at the bottom of the door, you’ll want to seal up the space on the sides of the door, near the frame. For this, your best bet is to use weather stripping. Cell foam tape is also an affordable solution for anyone on a budget.
3. Consider Airflow

Sound travels through vibrations in the air and other surfaces.
Therefore, sealing your room prevents sound from leaking out.
However, if you successfully make your room airtight, you need to ensure the room still has a source of air. Have an inlet and an outlet vent with a fan to ensure airflow.
Cover the vents with acoustic boxes. An acoustic box is like a P-trap for sound. It consists of an S-shaped passage with sound-absorbing material on the walls. The acoustic box will prevent sound from escaping out, and will also stop other sounds, like the noise of the fan, from leaking in. Use as quiet a fan as possible.
Air gaps are one of the main obstacles to getting a true soundproof room. Although you may never completely seal all of them (and you may not want to) the closer you can get, the quieter it will be. This is how you reduce sound transmission in and out of the room. Finding the right balance between airflow and sealed air gaps is going to make your work space much more comfortable, especially if you plan on spending a significant amount of time there (and if you’re serious about making music, you should!)
4. Address Vibrations

Sound entering and escaping your room doesn’t just come through the air.
There are also vibrations that pass through the walls, doors, and floor.
In fact, the vibrations that come through walls, floors, studs, and joists are frequently stronger than the ones that come through the open air. Solid items often convey sound more quickly and at louder volumes.
Noise reduction isn’t just about sealing off your room from open air and using a lot of soundproofing material on the walls. You also have to worry about the floor and the ceiling. And of course, anything else in your room that might easily pick up and transmit sound (bookcases positioned against the existing walls, for instance).
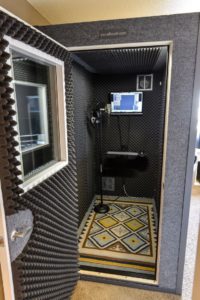
A Room Within a Room
One solution is to build a room within a room, but this solution is time-consuming and complex—and obviously not recommended if you don’t own the house. If you choose to go this route, you’ll probably wind up spending a bit more, money, and effort. But it is an effective way to make sure that you have the maximum amount of buffering. On top of that, you don’t necessarily need to use a lot of really high-end material.
The key here is to make sure you select a large enough room for your studio. After all, if you are using a “room within a room” approach, you are going to make your actual working space smaller in all dimensions––width, length, and height––as you create an air gap around your work station to block sound.
All in all, I wouldn’t recommend this approach to the beginner. You would need to essentially build your studio on top of a rubber barrier and construct a second “floor” for the studio. It will require a considerable amount of time and effort, as well as expense—and again, not recommended if you’re renting.
Easier Alternatives

At the very least, put 3 X 2-inch strips of high-density PlatFoam on the floor and place a sheet of plywood on top to create a new floor. This will stop vibrations from going out through your floorboards.
Carpeting the floor, walls, and the ceiling is a simple way to ensure that your room has sound absorption properties.
You may purchase and hang technologically advanced sound absorption and sound dampening panels in your room. These panels represent an investment cost but are not cost-prohibitive.
Sound absorption and dampening panels de-energize sound waves and reduce noise clutter. This prevents the existence of sound echoes that are dis-harmonic and unpleasant to listen to. Don’t try to use egg cartons as cheap diffusers—contrary to popular belief, the surface isn’t reflective enough to be effective, and they look terrible.
Soundproofing vs. Acoustic Treatment
You may hear some people talk about these two things interchangeably, but they are actually different concepts. Acoustic treatment refers to arranging your studio in such a way that the acoustics work well inside the room. In short, your primary concern is: “how does it sound while I’m in here?” It’s a worthwhile question to ask in a studio, but it’s not the same thing as soundproofing.
Soundproofing deals with sound transmission in and out of the space. Your goal is to limit the amount of sound that escapes the studio, as well as the amount of sound that gets in.
Why Soundproofing Is So Important
Of course you don’t want to be the person in your apartment building who is driving your neighbors nuts. If your music studio is leaking noise into the building or neighborhood, then you need to find a way to minimize the effect. Partly, it’s about being a good neighbor. But it’s also about having fun, and allowing yourself to get into the rhythm of your own recording or mixing sessions.
Sometimes when you’re editing music, you want to be able to listen to it at greater volumes. You need to know if the music you created is going to sound good lout or quiet. And when you are recording or playing an instrument, you absolutely want to be able to go all-out when the situation calls for it. If you are worried in the back of your mind that your music is causing a ruckus for the rest of the neighborhood, you won’t feel free enough to give your absolute best.
What Materials Do You Need?
So what tools and materials are you going to need if this is a DIY project?
Acoustical Caulk (Caulking)
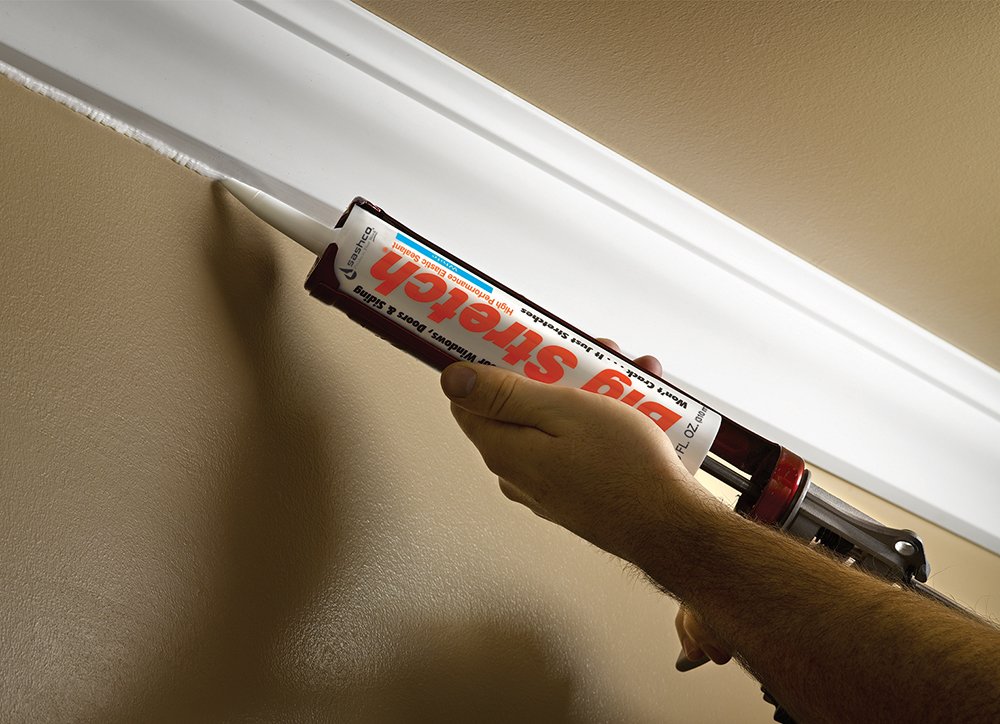
You can get different kinds of acoustical caulk, but the type manufactured by the Green Glue Company is probably the most well-known. Although––spoiler alert!––it’s actually not green at all! It’s usually white, and can be used in just about any setting. The caulk will seal gaps in the walls, floors, or ceilings. It can also be used for filling gaps near pipes and electrical outlets. Especially if you have an older home with more inconsistencies, it can really help to plug some of these trouble spots with a high-quality sealant that is designed specifically for this purpose.
Also, if you don’t want the caulk to show up as white after you use it, this particular brand is paintable after you use it. You can add it to your walls without having to worry about it becoming an eyesore, provided you simply match the paint to the current wall color.
Door Sweep
This handy gadget sits at the bottom of your door and seals the space between the door and the floor (or the moulding surrounding the bottom part of the door frame). Door sweeps are inexpensive and easy to install, and you will certainly want one in order to plug one of the loudest potential air gaps in your studio.
Acoustic Foam and Soundproofing Panels

If you want to put a stop to reverberations coming through your walls, these panels can help address some of the biggest trouble spots. You can either make your own acoustic panels, or buy them. In either case, they are relatively inexpensive, and are generally more effective than hanging a lot of thick blankets, drapes, or heavy-duty blackout curtains. The soundproofing panels provide an extra layer of protection between the walls and your work space, and will also help dampen escaping sounds as well.
This material is absorbent and can be extremely effective if you purchase a high-quality or even a moderately decent brand. Cheap varieties, however, won’t help you against lower frequencies. If you use one of the absolute bargain versions, you’ll probably still get a lot of extra noise leaking through. The foam helps create a sound barrier around your work area and can dampen reverberation and sound waves.
If you can get a professional grade acoustic foam, you should do it. This material is surprisingly inexpensive, and can be used whether you’re creating a “room within a room” or just using it to block sound coming from a specific area.
If you cover the walls and ceilings of your studio, it will help prevent sound from escaping too, so you can play your music at louder volumes without worrying about angering the neighbors.
Take It Slow
You are almost certainly excited and enthusiastic at the prospect of building a studio space that is as good as it can possibly be. Still, if you haven’t done many home improvement tasks before, you should make sure that you don’t make any changes that are too permanent. Knocking out drywall or completely remodeling your space might be something that you regret if you don’t plan it out well in advance.
I’d say the best approach is to start with making changes piece by piece. If something isn’t working, you can always change your mind later. But it’s better to start small and work your way up, rather than to take on a huge remodeling project that is more than you originally planned.
Welcome To Your Soundproof Room

Soundproofing a room takes a bit of work, but it’s an easy, cost-effective project that you can hammer out in a few days.
Complete the job in stages and make recordings as you proceed so you can compare the sound quality before and after every improvement that you make. You’ll see that the better your room gets, the better your recordings are.
Start by soundproofing an existing room and then move to the room within a room concept if you don’t get the results you want. Learning how to soundproof a room for music is a critical skill for anyone who aspires to be a recording artist.
Don’t fret mistakes; learn from them on your way to creating the perfect music room!
Source URL: https://www.audioegghead.com/how-to-soundproof-a-room/
