
When the eccentric nuts are adjusted correctly, they prevent the V-wheels from moving too far away or too close to the X axis beam. They also ensure that the carriages remain aligned while printing.
Some users have reported that their printers were wobbling while they were printing and they solved this problem by adjusting the eccentric nuts.
What is an Eccentric Nut?
An eccentric nut is a nifty little device that provides an impressive amount of functionality. The gist of this little gem is that it has a 5mm off center hole drilled through it, and it can make your life easier by making the task of mounting your V-slot based gantry on a build plate a breeze. Luckily, this is a standard feature on the Shapeoko 3 so you don’t have to worry about upgrading your machine to get this cool looking spacer. This nifty little nut is one of the most useful parts to come into play on your machine, and we’re proud to have snagged them at an affordable price. It comes in the form of a 9 pack, enough to replace all your Shapeoko 3’s standard Eccentric Nut. You will also need a hefty 8mm wrench for the job. This is a must have in your toolbox, and we’re sure you’ll thank us for it later down the line.
Eccentric nut issue – Troubleshooting – Inventables Community Forum
Why Do I Need to Adjust the Eccentric Nuts?
Eccentric nuts are a simple but important adjustment to make on your 3D printer. They can help remove wobble on your X-axis, Y-axis, or Z-axis carriages.
A wobbly gantry will cause issues with print quality, layer artifacts, and more. This is why you should regularly check your eccentric nuts to ensure they are tight enough to hold the wheels and rails together.
You can adjust the eccentric nut adjustment by turning them in a clockwise or counterclockwise direction. You want to try spinning the nut around completely at least once to get a feel for how much tension you need. You shouldn’t tighten the nut too much or you can dent the wheel. You may need to do this several times before you find the right tightness for your printer. Having a properly adjusted gantry will save you time and money in the long run. It will also ensure a level build plate and allow your 3D printer to move smoothly.
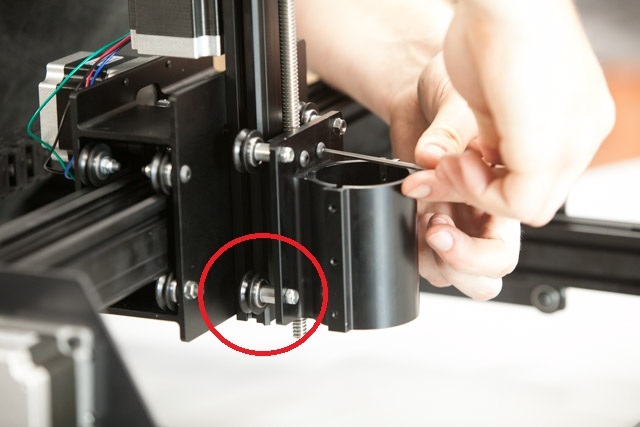
How to Adjust the Eccentric Nuts
The eccentric nuts allow you to adjust the tightness of the V-wheels. They help ensure that the wheels aren’t too loose or too tight, and they also prevent the rollers from shearing and grinding to a halt when there isn’t enough tension on the rail.
If you want to get the best possible performance out of your printer, you should make sure that everything is properly adjusted. This includes your V-wheels and the X-axis profile.
For example, if you’re having trouble with the quality of your cuts, it could be that your eccentric spacers aren’t tightened correctly. Luckily, this isn’t something too complicated to do.
To adjust the eccentric spacer, you should first tighten the two screws that connect to the spacers on each side. When you’re finished, you should have four spacers that are evenly tightened on both sides. This will keep the ACME rod from swaying and will make sure that the machine is operating at its best.
Pro Tuning Guide – Crane Documentation
How to Turn the Eccentric Nuts
The eccentric nut is one of the most important parts on the Ender 3 base. It ender 3 eccentric nut allows you to adjust the tightness of the V-wheels so that they are not too loose or too stiff. It also helps you to get the correct tension for your print bed, which will make the job of setting up and disassembling your printer much easier.
To do this, you’ll need a wrench and a pair of pliers. The key is to find the right sized nut and turn it using the wrench’s notch in the body of the tool. Then, twist the nut clockwise until you hear it click and feel some resistance. This should be a good sign that the nut is in the right position. Next, use your pliers to open the nut to access the nuts that hold the v-wheels. Finally, replace the nut and torque it to 45 Nm (33 ft-lbs). It should now be time to print!
