

Original article: https://www.redflaghomeinspection.com/wind-mitigation/
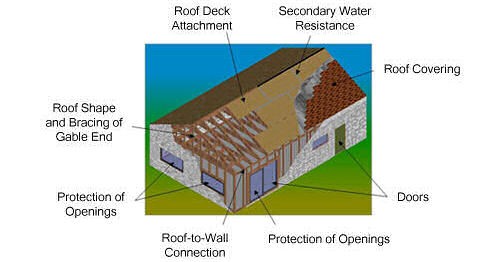
The inspector will evaluate and itemize the construction/configuration features that were incorporated into your home’s construction that will aid it in withstanding damage from a passing windstorm. The Florida Department of Financial Services, Florida Division of Emergency Management, Florida’s Foundation, Insurance Institute of Business and Home Safety, and the Florida Alliance of Safe Homes all endorse and apply the same science/research-based guidance and recommendations to alert and warn the general public as it relates to these damage saving and safety securing construction items. The results of this guidance culminated into the “the Uniform Mitigation Verification Inspection Form”, which can be turned into your insurance company for consideration toward significant discounts. Your inspector’s mission is to evaluate your property for these safety/strengthening components.
Florida Statute 627.0629 requires that insurance companies offer Florida residents “discounts, credits, or other rate differentials.…” for construction techniques that are proven to reduce wind damage caused by hurricanes and other tropical storms.
The features cited in this report must be verified by a licensed inspector. Some of the ways the inspector can verify these components are through permit numbers, invoices, installation date documentation, and engineering approval numbers for materials. Photographs demonstrating the various criterion are met must also be included in this report for acceptance and consideration.
It is important to note that the inspector nor the homeowner have any say or input relating to the decisions made by your selected insurance company to offer discounts or consideration to this report. In some cases, you may be presented with opportunities to gain additional discounts by adding missing materials/components, like hurricane shutters. It has been our experience that the majority of our customers gain discounts, since you are eligible to achieve each discount while not being eligible for others. The report gained is good for a 5-year span, and can be provided to other insurance company’s for quoting purposes in the event you are shopping around (provided the report is not more than 5 years old).
We have observed and been informed of significant discounts from hundreds to thousands on client’s premiums.
So what are the inspectors looking for?
Table of Contents
-
Construction Date
-
Roof Installation Date
-
Roof Geometry
-
Roof Deck Material
-
Secondary Water Resistance
-
Roof to Wall Attachment
-
Opening Protection
-
What is a Wind Mitigation Report?
-
Insurance Inspections: What is a 4-Point Inspection?
-
Flipped Houses: The Battle Between GOOD (Construction) and EVIL (Investment Costs)
Construction Date
Your inspector will document the building construction permit application, to see if it was dated before/after September 1, 1994 (Miami-Dade & Broward; high wind) or before/after March 1, 2002 in the rest of the state. This is due to these buildings having been built in accordance with the South Florida Building Code (SFBC-94) or the Florida Building Code (called 2001 Florida Building Code, or FBC). In March 1, 2002, the Florida Building Code was set to supersede all other Local Building Codes in Florida. Buildings constructed prior to these dates may not have utilized the same construction standards, as the Building Codes are the standard that Contractors must clear to construct their projects. Building codes have gotten more strict overtime, and improved the way we construct our buildings. We learn from our failures and strengthen the criteria with every passing version, which in Florida happens every 3 years. To aide your inspector, feel free to collect any documentation of permit dates, certificates of occupancy, or other construction documents that show when the house was constructed.
Roof Installation Date
Here the inspector will also document the date of installation, but for the roof itself (and not the entire building). Obviously, if the entire building met this criterion then the roof would have as well. Often, however, the roof can meet the criteria but not the building due to the roofing material having been replaced at a later date (and done so under a more recent Building Code). So roof installations after these dates demonstrate that they were permitted/installed in accordance with the FBC. This means that the materials were assessed, the fastener type/spacing, the number of fasteners per shingle/tile, etc. through the required permitting process. Similar to the building construction date, you can aide your inspector by compiling any receipts or documents that reflect the installation date(s) of the roof.
Roof Geometry
When it comes to Wind Mitigation Reporting, the Roof Geometry portion is a BIG deal. As you are likely aware, most residential roofing systems rely upon water shedding (not waterproofing) to keep the water out of our houses. This is commonly achieved through sloping of the roof surface to make a continuous drainage path for water. A solid in-depth article on this topic can be read HERE (which you can read later, not now). So those shingles, concrete, or maybe clay tiles are up there on the roof are there to shed the water and take the impact of the harmful UV rays (not to waterproof). Now let’s imagine wind is passing by these two similar buildings. Which one do you think would perform better?
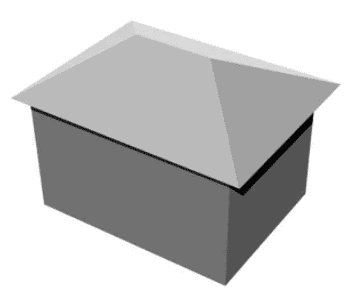
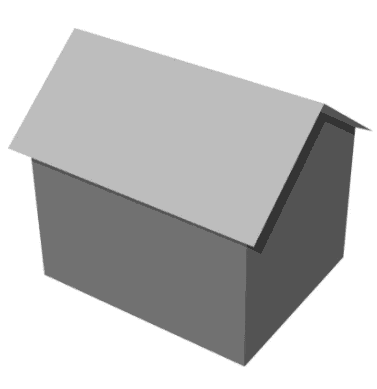
Did you guess the top one? If so, you would be right. But why? Let’s look at how wind behaves on a building. In the diagram below, you will see lines that represent wind patterns. As the wind flows toward the building, it gets obstructed and has to turn upward to go up and over the roof. The re-direction of the wind causes a suction (upward) force to act on the windward side of the roof. As the wind comes back down to the roof, that suction force dissipates. The upward arrows on the roof are showing the pressure (force) direction, with the longer lines being more increased pressure (and the shorter being less):

Now, you are probably asking why there is a suction force. Right? No? OK, well if you were asking, I would say that it works on the same principles as an airplane wing. Imagine a mass of air hits the front of the building below, some of it hits the wall and goes up/over and some of it goes along the sidewalls of the building. But all of the air (the up/over air and the sidewall air) meets back at the back of the building where it exists. So consider the diagram below. The air at the gable end of the building hits the wall, gets deflected upward, causes that section suction force, comes back down to the roof, then angles back down to the location of B. The blue line below reflects the path of this air:
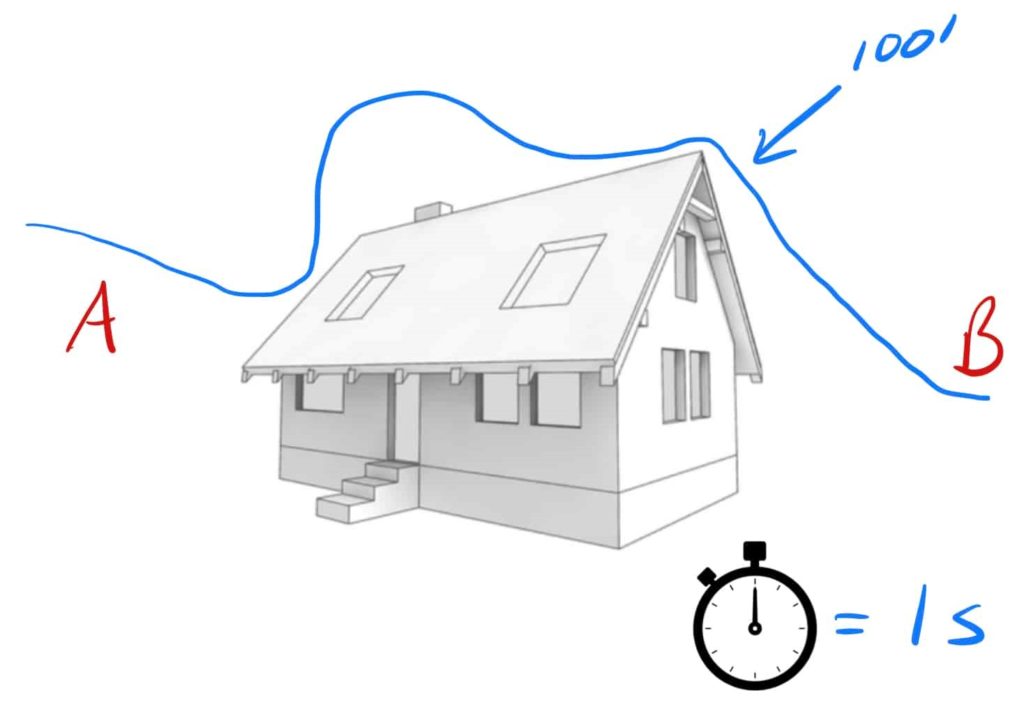
Now, let’s say that the air, in the above scenario traveled a total of 100 feet of actual distance (as if I were to straighten out that wiggly line), and it did it in 1 second. That means the air going up/over is going 100 feet per second (fps) or 68.2 miles per hour.
So now, for fun let’s consider the air that just went up the side of the building (see image below). This air didn’t hit the gable end, so it didn’t have to deflect, it just went straight up the side of the building:
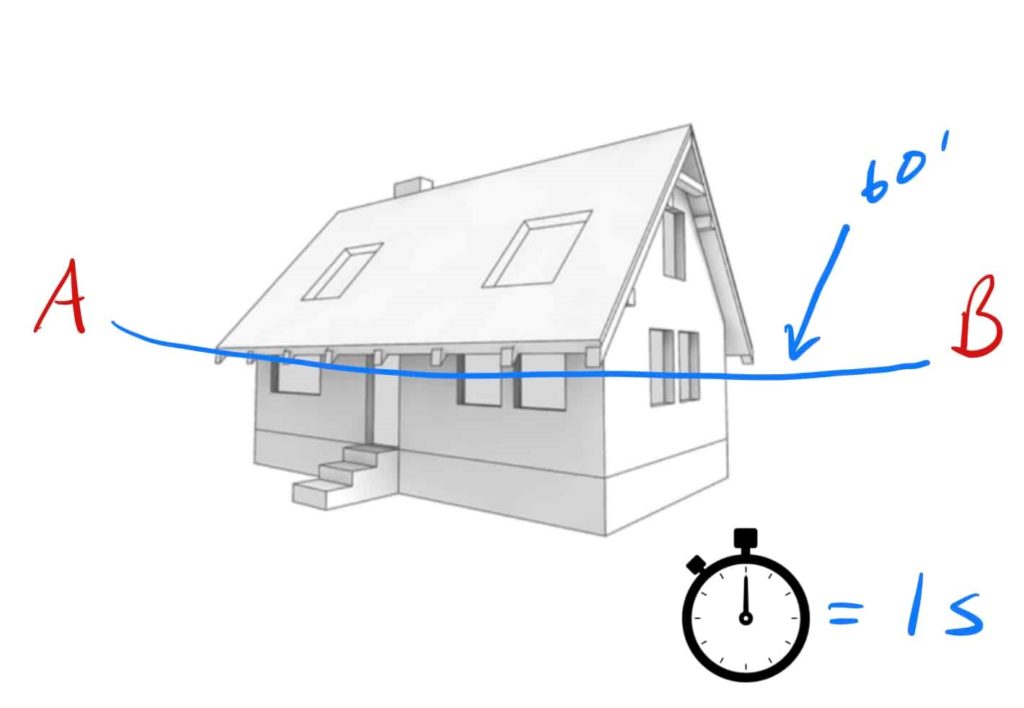
Since it took a much more efficient path, that air only traveled a total of 60 feet. Now again, all of the air starting at A and ending at B starts at A at the same time and ends at B at the same time. Why? It’s a pretty complex explanation, so just trust me (it’s a concept that aerodynamics and engineering are based on). It just works! Anyway, so since this air has to meet up with it’s buddy (the air that took the long way over the top), they both do it in 1 second’s time. So in the scenario below, the air goes 60 feet in 1 second (60 feet per second). This equals around 41 miles per hour.
Do you ever find yourself just talking and talking and not remembering where you were going with the story? That just happened! But I’m back. The suction forces (that was where we were going)! So the air traveling above the roof has a longer trip to make in the same amount of time as the air on the side. The air moving faster, and the upward swing of the air causes the suction effect. Not buying it? There’s a bunch of cool experiments you can do with your kids here. My favorite is the floating ping-pong ball trick. You take a ping pong ball and blow under it with a straw. It “sticks” to the air and only falls when you stop blowing. You can do the same thing with a hairdryer. It “sticks” to the air source because when it starts drifting to one side of the other, it has fast air moving on one side and little/no air movement on the other. That creates a suction force and pulls it toward the air source, keeping it in balance (as long as the air is flowing). Do it with the kids, they will be amazed that you can balance a ping pong ball in the air above a straw!

I’m not going to edit that portion out, the ping pong experiment may be my favorite blog section thus far. Admittedly, I got carried away. Sorry, I’m back.
So now that we know HOW air movement affects the roof, it’s not tough to see how the lesser obstructing and more gradual all hip roof would fare better than the gable roof (it “bends” or displaces the air much less; less suction). So when you are house shopping, if you see a hip-shaped roof, give that house bonus points. It could save you a bunch of money. Again, you can learn more about roof geometry in my prior article HERE (for light reading later).
Roof Deck Material
The weakest link in any system can cause other over-designed and much stronger components to fail. In the case of the roof decking, the roof is only as strong as it’s attachment to the building (and the finished roofing product only as strong as its connection to the decking). In this section of the Wind Mitigation report, you would get a solid discount for having concrete roof decking. These aren’t really common in typical residential construction, but they are certainly out there. You are also (likely) in line for discounts when you have 7/16 inch thick plywood or oriented strand board (OSB) decking, provided it has 6d or 8d fasteners and 24 inch on-center trusses. If your inspector cannot get into the attic, you will not be able to get these discounts at all (so you may want to consider having an attic access opening cut if not). So clear out the Christmas decorations and make sure he/she can get in there. The inspector will use a metal detector to determine where the fasteners are within the upper truss cord (the 2×4 lumber for the truss that the roof decking is fastened to). They will also measure the length of the fastener to confirm the type of nails used.
Secondary Water Resistance
So what is secondary water resistance? The FBC defines it as:
A water-resistant /roof underlayment layer or product that provides protection to the structure to which it is affixed in the event the primary roof covering is damaged, removed, or penetrated by wind driven rain as the result of hurricane-force winds.
So you can get credit for this one of two ways, self-adhering polymer-modified bitumen underlayment (peel & stick sheets) or closed-cell foam adhesives. The peel and stick route requires the roof deck seams to be sealed using self-adhering sheets or tape, to cover the joints. Peel and stick can be installed atop felt paper, but only that installed directly to the wood substrate count toward secondary water resistance. See example below from Echo Tape. The idea is that if you lose the asphalt shingles, water will still be temporarily kept out by the tape lining the joints.

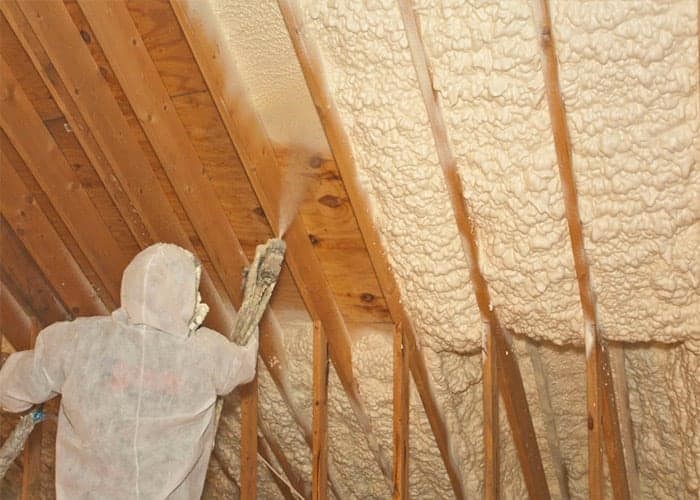
The closed-cell foam adhesives (the 2nd option mentioned) are sprayed onto the underside of the roof decking. See example below from Superior Insulation Services. Technically, this foam only has to cover the roof decking seams, but typically installations are globally done as you see in the sample below. The concept is aimed at sealing the joints between the panels, but studies have suggested that the foam embeds the fasteners that stick through into the attic (strengthening fastener engagement, and improving the strength of the roof covering).
Roof to Wall Attachment
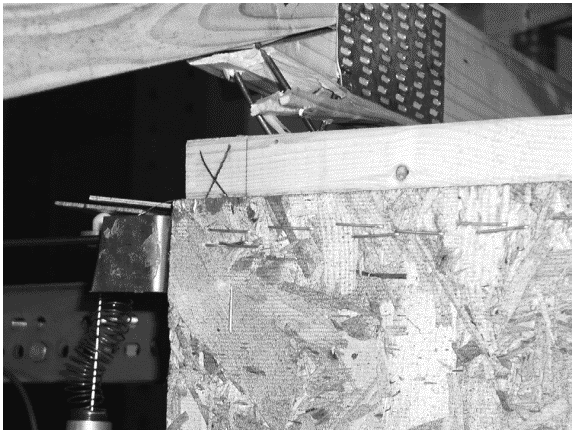
Here the inspector is looking to find the WEAKEST roof to wall attachment in your selected home. So in order to help you understand the differences in some of the construction techniques used, I dug up some NIST testing on the topic. “Experimental Testing of Roof to Wall Connections in Wood Frame Houses” was produced by the United States Department of Commerce Technology Administration (National Institute of Standards and Technology). This study constructed a small-scale section of a mock house and vertically loaded it to simulate upward lift from a passing storm.
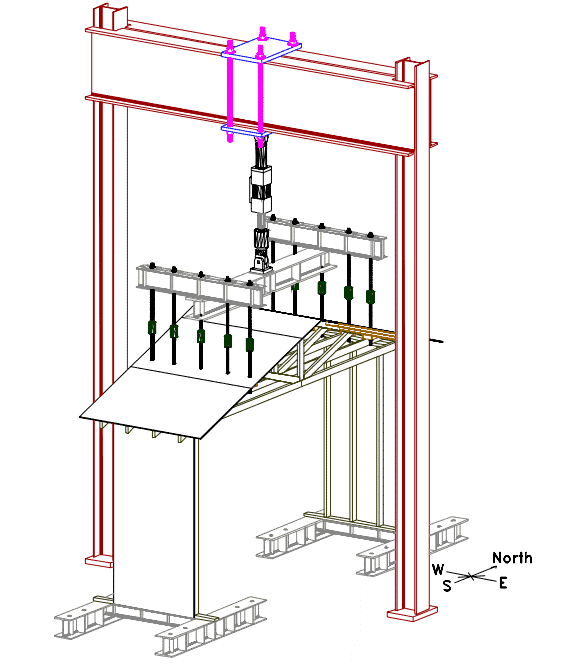
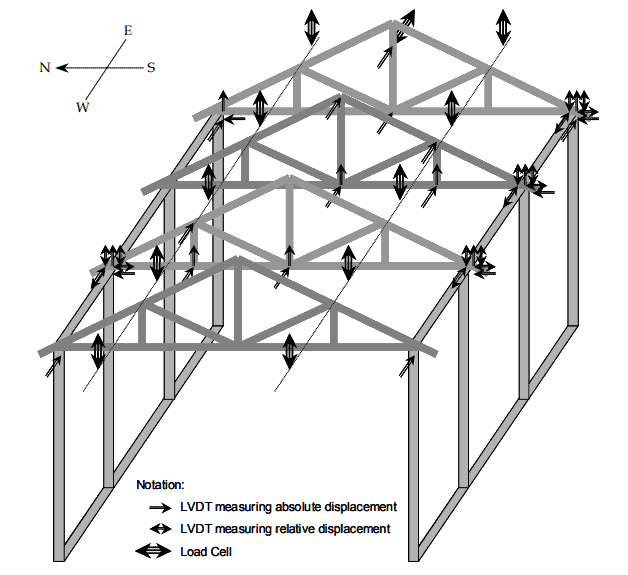
A very large steel frame was constructed with a central lifting point that transferred the load to the roof of the specimens by a series of threaded connections. Various displacement gauges and stress sensors were installed at strategic locations to monitor the reactions in the roofing, as the testing was being conducted:
The testing was conducted to failure, in which the method/reaction at failure was recorded. This allowed them to research if individual connections were more significant than others. Reviewing the results, it was noted that the strength for hurricane straps were far superior to toe-nailing.
The Top Solid line is the Hurricane strap, while the similar pattern dotted line was the toe-nailing.
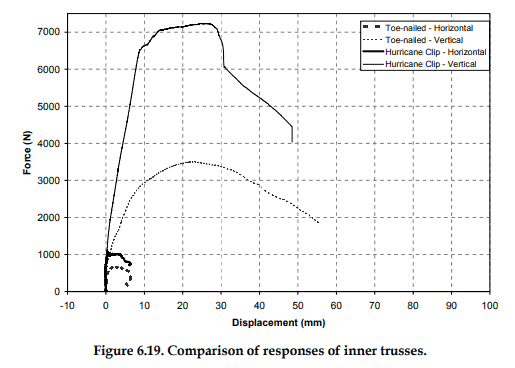
So what we learned, which may not come as a surprise to many of you, is that strapping works far more effectively than toe-nailing (which had been the gold standard up until the 2000’s). Now if 1 strap was this more effective than toe-nailing, then you better believe that 2 straps stands to be at least better than 1 strap. That is indeed the case. So if you have 2 hurricane straps over your truss cords, expect a decent insurance discount. The ranking of roof to wall connections from BEST to WORST are:
- Double strap
- Single strap
- Clips (hurricane ties that fasten to the side of the trusses)
- Toe nails
- No connection (gravity).
To qualify for credit, however, there must be a minimum of 3 nails on clips/straps, straps must be fastened to the opposing side of the truss, they must be free of corrosion, and they cannot be more than ½ inch offset from the truss’ location without proper blocking. They also must be on all trusses. If your house has several types of connections, the WEAKEST one must be used for this purpose (including NO connection if they did every other or every third truss).
In the event you do not meet these criteria, or you are interested in raising your level of protection, there are third-party companies that specialize in retrofitting houses with proper tie-down toward safety and wind mitigation credit. The expense of this service may be offset over time with discounts you stand to receive (so it’s worth discussing with your insurance company to see how much you could be saving per year). Just make sure you remember to call Red Flag Home Inspection every 5 years to keep those discounts coming!
Opening Protection
This is another BIG one, that can lead to a sizable discount when the criteria is met. Opening protection deals with barriers or protections that your house has to help the windows and doors weather a storm. The materials used has to be capable of meeting or exceeding a “large missile impact” engineer rating. This includes ALL windows, doors, or other openings that are larger than 3 inches by 3 inches (including the garage door). Research and analysis of failed buildings have shown that once the exterior envelope of a building is compromised, the internal pressure within the building doubles and the roof is more likely to blow off. Further, excessive damage can be done to the indoor environment by the intrusion of wind-driven rain through breaches.
So how is credit for the Opening Protection category achieved? You must protect all windows, doors, sliders and openings from impact (including skylights). This can be done by using impact-rated glazing, approved hurricane shutters or coverings. You can also invest in outward swinging and impact-rated exterior doors. Like the other categories, you can budget in the discounts you stand to receive to assist with your cost analysis. Generally speaking, field-applied films do not qualify for hurricane protection (and likely void the manufacturer’s warranty on the windows). The storm shutters will be evaluated by your inspector for the following criteria:
- n/a (no openings in the structure
- Verified cyclic pressure and large missile (9 lb for windows; 4.5 lb for skylights)
- Verified cyclic pressure and large missile (4-8 lb for windows; 2 lb for skylights)
- Verified plywood/OSB meeting Table 1609.1.2 in FBC 2007
- Verified non-glazed entry or garage doors compliant with ASTM E 330
- Various combinations of these
- No windborne debris protection
If you believe you meet these criteria, it is best to have the opening protection installed at the date of the inspection to clearly slow/demonstrate that you have all openings accounted for. If you have invoices and documentation about the opening protection and it’s level of protection, this will aide your inspector in applying the proper classification.
Summary
There are several solid opportunities to save significant amounts on the wind portion of your homeowner’s insurance coverage, by implementing these safety and strengthening measures. You will have the comfort in knowing that you have the best construction to weather the storm, and will save money well into the future. Most impactful of this article is that you may already qualify for several layers of discount that you are not yet receiving due to not having a Wind Mitigation report. This standardized report is required, authored by a trained and licensed professional, for acceptance and consideration by your Homeowner’s Insurance company. So CALL TODAY (813-403-7756) and request a Wind Mitigation report! Be sure to set a reminder for 5 years from the date of your last report, to ensure these benefits do not lapse (and the insurance hikes up your rates)!
