
The purl stitch is one of the basic stitches in knitting and is commonly used to create various textures and patterns. Once you learn to hold your knitting needles and make knit stitches then you are introduced to the purl stitch. It is the opposite of the knit stitch and adds a bumpy or textured appearance to your work. It appears like a bump or what can be identified as inverted U. Like two sides of the same coin, knit and purl are opposites that balance each other. A knit stitch in the front side of a knitted fabric always looks like a purl stitch on the opposite side.
As beginners you work on either a fabric of knit stitches (Garter) or a combination of knit or purl stitches (Stockinette). If you are working on a pair of single pointed needles on a flat pattern, you follow the pattern instructions and turn your project after each row. If you are knitting in the round with a set of double pointed needles or circular needles you don’t purl the stitch even if you are working on a stockinette pattern as you are always working on the right side.
Here’s a step-by-step guide on how to purl stitch in knitting:
Step-by-Step Guide to Purl Stitch:
- Hold the Needles:
Hold the knitting needle with the cast-on stitches in your left hand (the needle with the stitches is known as the left-hand needle).
Hold the empty needle in your right hand (the needle without any stitches is the right-hand needle).
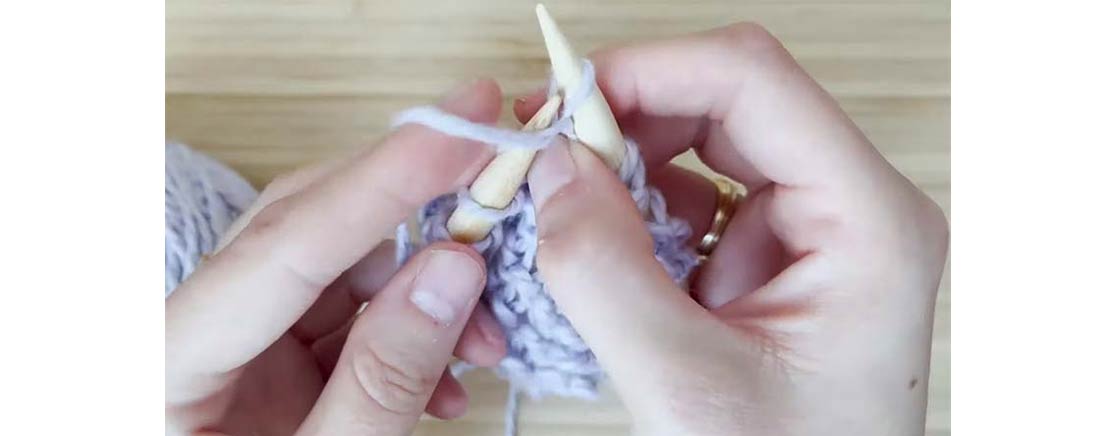
- Insert the Right-Hand Needle:
With the right-hand needle, insert the tip from the front to the back through the first stitch on the left-hand needle.
- Position the Yarn:
The working yarn (the yarn attached to the ball) should be in front of the right-hand needle and held down with your right index finger to create tension.
- Wrap the Yarn:
Take the working yarn from back to front, going between the two needles, and wrap it around the right-hand needle in a counter-clockwise direction.
- Pull Through and Drop the Stitch:
Using the right-hand needle, pull the wrapped yarn through the stitch on the left-hand needle towards the front of your work.
Slip the old stitch off the left-hand needle, and you now have one purl stitch on the right-hand needle.
- Repeat:
Continue to repeat steps 2 to 5 until you have purled all the stitches from the left-hand needle onto the right-hand needle.
- Finishing the Row:
Once all stitches are purled, the left-hand needle will be empty, and all the stitches will be on the right-hand needle.
Turn your work if you are knitting flat (working back and forth in rows), or if you are knitting in the round, continue with the next round as instructed in your pattern.
Tips for Purl Stitching:
Purl works similarly to the knit stitch but many times the effect is a little sloppy. The reason is that most people purl differently.
- Maintain even tension on the yarn as you wrap it around the right-hand needle to avoid loose or tight stitches.
- Purl stitches can feel a bit awkward at first, but with practice, you’ll become more comfortable with the motion.
- If you’re knitting flat and working both knit and purl stitches, pay attention to the pattern instructions to ensure you are using the correct stitch at the right time.
- If you find that your purl stitches are not uniform, you can try out bigger size of knitting needles.
With the purl stitch in your knitting repertoire, you can create beautiful textures and combine it with other stitches to design a wide range of projects.
For all your knitting needs, explore the KnitPro Collection. With knitting needles in options of wood, bamboo, stainless steel, aluminium, carbon fiber, acrylics and more, the wide range includes single pointed, double pointed, fixed circulars and interchangeable circular knitting needles and sets.
Happy knitting!
